Users
upload a file from HTML form to AWS S3. As user requirement, details
of the file to upload can be stored for security reasons. Details of
the file uploaded to AWS S3 bucket using HTML form can be tracked.
The metadata of such tracked files are stored in Dynamodb table.
For performing the target
operation three AWS services are being used
1. Lambda – For programming
(Python)
2. Dynamodb – For storing
items in table
3. S3 – For file storage
Along with AWS, HTML form and
Python is being used as the environment.
The target operation has been
explained in the following steps. The highlighted sections in the
screen are intentional for quick information grasp.
Step 1: Log into AWS console.
Dynamodb is grouped under the category Database in services section.
Fig. 1 illustrates Dynamodb under Database category in AWS console’s
services. Click on Dynamodb to create a table.


Fig. 1. AWS Services
Step 2: Create a table by clicking on create table.

Fig. 2: Create table
Step 3: Naming the table, primary key and assigning a type to the
Primary key can be found here. In the following Fig. 3 a table named
“S3meta”, and “Name” as the primary key field of String
type has been created.

Fig. 3: Assign name and
primary key for table
Step 4: The created table looks as follows. This is the view of our
table.

Fig. 4: Table view
Step 5: Go to AWS Services, create Lambda function. In the following
Fig. 5 a function named “Metaupload” and “Python
2.7” as the runtime has been created.

Fig. 5: Lambda function name
and runtime
Step 6: As the entry type of my function
is In line “Edit code inline” has been
selected
Select your respective region. In the Fig. 6, 'us-west-2' has
been selected as the region and “connectionexample” as
the S3 bucket name.
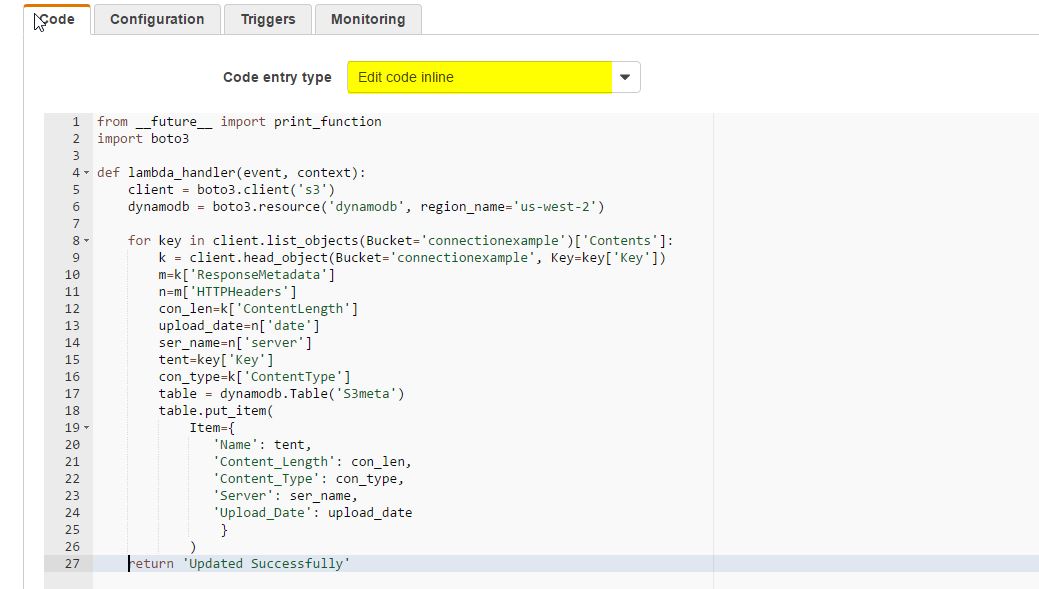
Fig. 6: Python code entry type
and programming
For reference here is the python code for lambda function.
from __future__ import
print_function
import boto3
def lambda_handler(event, context):
client = boto3.client('s3')
dynamodb = boto3.resource('dynamodb', region_name='us-west-2')
for key in client.list_objects(Bucket='connectionexample')['Contents']:
k = client.head_object(Bucket='connectionexample', Key=key['Key'])
m=k['ResponseMetadata']
n=m['HTTPHeaders']
con_len=k['ContentLength']
upload_date=n['date']
ser_name=n['server']
tent=key['Key']
con_type=k['ContentType']
table = dynamodb.Table('S3meta')
table.put_item(
Item={
'Name': tent,
'Content_Length': con_len,
'Content_Type': con_type,
'Server': ser_name,
'Upload_Date': upload_date
}
)
return 'Updated Successfully'
Step 7: Enter the remaining details in lambda function creation like
Handler and Role. Role is used in execution, for accessing
permissions from other AWS services.

Fig. 7: Providing Handler and
Role
Step 8: Go to IAM (Identity and Access Management) and attach policy
for the given role.

Fig. 8: IAM Role
Step 9: Accessing
operations from dynamodb or S3 has to be authorized. Policy document
aids in creating the authorization.
In
the following code snippet,
change
Resource link to your dynamodb table arn. “connectionexample”
is my bucket name, if you use different name then change the bucket
name too.
{
"Version":
"2012-10-17",
"Statement": [
{
"Effect":
"Allow",
"Action":
[
"dynamodb:GetItem",
"dynamodb:BatchGetItem",
"dynamodb:Query",
"dynamodb:PutItem",
"dynamodb:UpdateItem",
"dynamodb:DeleteItem",
"dynamodb:BatchWriteItem"
],
"Resource":
"**Your dynamodb arn**"
},
{
"Effect":
"Allow",
"Action":
[
"s3:*"
],
"Resource":
[
"arn:aws:s3:::connectionexample",
"arn:aws:s3:::connectionexample/*"
]
}
]
}
Step 10: After completion of
writing a policy document, name the policy. Validate the document by
click on “Validate Policy” to validate against errors if any. If
the policy is valid, then click on “Create Policy”.

Fig. 9: Policy document
validation and creation
Step 11: Attach the created
policy to our role. As shown in Fig. 8.

Fig. 10: Policy attach to Role
Step 12: After successful
creation of policy and role go
to AWS 3 and create a bucket.
Then click the properties on top right of page select “Events”.

Fig. 11: S3 bucket properties
Step 13: In the events select
an event to trigger while uploading to S3, so we select
ObjectCreated(All).

Fig. 12: Events
Step 14: A
lambda function has to be triggered on every file upload to S3. So to
perform trigger after successful file upload select a lambda function
which created already in step 6.

Fig. 13: Lambda function to be
triggered
Step 15: Now create a HTML
form to upload a file manually from user system. Fig.14 is the HTML
template. More
details on policy, signature can be found under
https://s3upload.blogspot.in/

Fig. 14: HTML template
Step 16: Run the HTML form,
select a file to upload on
S3.

Fig. 15: File selection for
upload
Step 17: Click upload file to
S3 button.

Fig. 16: File selection for
upload
Step 18: Refresh the S3 bucket
and validate
the file upload operation.
Is file uploaded or not.

Fig. 17: Refresh S3 for
uploaded file
Step 19: Refresh the dynamodb
table and see the items that are inserted into table.

Fig. 18: Dynamodb refresh for
table items
Step 20: Click the name to
expand and see the details of table items.

Fig. 19: Details of table
items
Conclusion :-
After successful upload of a file on S3 bucket from HTML form, the respective file's metadata will be stored as a table in Dynamodb.
Thank You,
Bhanu Teja Kotaiahgari,
Developer Trainee Technical,
MOURI Tech Pvt Ltd.